Project No. 24053  |  Structural Engineering: HK Solutions
For Licensed Professionals Only  |  redipool.com.au
REDI Pool Installed
Redi Pool PTY LTD — ABN 79 667 553 175

Installation
Guide

Step-by-step technical guide for the installation of a REDI Pool precast concrete pool. For use by licensed installers, builders, and landscapers only.

Precast Concrete Australia-Wide Professionals Only

About This Guide

This guide has been prepared by REDI Pool to assist qualified tradespeople and installation professionals with the correct installation of a REDI Pool precast concrete pool.

All installation work must be carried out by appropriately licensed and qualified trades. Engineering drawings (Drawing Set 24053) are to be read in conjunction with this guide. In the event of any discrepancy, the engineering drawings take precedence.

For professional use only. This guide is not suitable for untrained individuals. REDI Pool accepts no liability for installations carried out by unqualified persons or that do not meet the requirements set out in this document and the accompanying engineering drawings.

Contact REDI Pool

For technical support before, during, or after installation.

Pool Specifications

DimensionMeasurement
Exterior Length4,915 mm
Exterior Width2,975 mm
Interior Swim Length4,715 mm
Interior Swim Width2,775 mm
Interior Swim Depth1,500 mm
Total External Depth1,700 mm
Shell Wall Thickness100 mm
Shell Weight (excluding finishes)12.2T
Entry Step Width2,775 mm
Entry Step Depth300 mm
Entry Step Height300 mm
Entry Step Water Level200 mm
Third Step (Corner / Triangular)
Step ProfileTriangular (corner form)
Step Dimensions600 mm x 600 mm x 930 mm
Height from Top of Pool1,000 mm
Height from Water Level900 mm
L-Shaped Second Step & Spa Bench Seat
Second Step Width (entry end)2,775 mm
Second Step Surface Depth (entry end)450 mm
Spa Bench Seat Length (long side)3,965 mm
Spa Bench Seat Depth (from wall)450 mm
Height from Top of Pool to Seat/Step Surface600 mm
Height from Water Level to Seat/Step Surface500 mm
Concrete Grade (f'c)50 MPa
Pool Dimensions Diagram 1 Pool Dimensions Diagram 2

Required Professionals & Trades

The following licensed and qualified professionals must be engaged before installation begins. Coordinating these trades is the responsibility of the installer or builder. Each trade will advise on their specific equipment and materials requirements for your project.

🔬

Geotech Engineer

Soil assessment & bearing capacity certification

⛏️

Earthworks Contractor

Site excavation & preparation

🏗️

Crane Operator

Site-specific requirements apply — installer to assess and arrange.

Licensed Electrician

Earthing & all electrical connections

🔧

Licensed Plumber

Plumbing connections & filtration hookup

Building Approvals & Certification

REDI Pool accepts no responsibility or liability whatsoever in relation to building approvals, development applications, certifications, or any state or local council regulatory requirements. This is entirely the responsibility of the installer, builder, or property owner.

What REDI Pool Provides

  • An Engineer's Certificate is supplied with every pool
  • We are happy to assist with any additional information — contact us directly

Our Recommendation

We strongly recommend engaging a qualified professional who specialises in DAs, building approvals, and certifications. Requirements differ across every state and local council — a specialist will ensure your project meets all applicable regulations for your specific location.

The following is provided as a general suggestion only. REDI Pool accepts no responsibility or liability for the accuracy, completeness, or currency of this information. Always verify requirements with your local council and a qualified professional before commencing work.

Northern Territory NT

  • Development Permit (Darwin City Council, Palmerston City Council, or relevant local council)
  • Building Permit
  • Pool safety barrier compliance — check NT local council requirements
  • Compliance with AS 1926.1 (Pool Barriers)

Queensland QLD

  • Development Approval (DA) from local council where required
  • Building Approval/Permit
  • Pool Safety Certificate — licensed pool safety inspector
  • Registration on the Queensland Pool Safety Register
  • Queensland Pool Safety Laws (Building Act 1975)
  • Compliance with AS 1926.1

New South Wales NSW

  • Development Application (DA) through local council where required
  • Construction Certificate (CC) or Complying Development Certificate (CDC)
  • Pool Safety Certificate
  • Registration on the NSW Swimming Pool Register
  • NSW Swimming Pools Act 1992
  • Compliance with AS 1926.1

Victoria VIC

  • Building Permit through local council or registered building surveyor
  • Pool barrier compliance
  • Compliance with the Victorian Building Regulations
  • Compliance with AS 1926.1
  • Notification to local council may be required upon completion

South Australia SA

  • Development Approval through local council or Planning and Design Code
  • Building Consent where applicable
  • Pool safety barrier compliance
  • Compliance with AS 1926.1

Western Australia WA

  • Building Permit from local council (required for in-ground pools)
  • Development Approval may be required depending on local planning scheme
  • Pool barrier compliance and safety inspection
  • Compliance with AS 1926.1 and WA Building Regulations 2012

Tasmania TAS

  • Development Application to local council where required
  • Building Permit
  • Pool safety barrier compliance
  • Compliance with AS 1926.1

Australian Capital Territory ACT

  • Development Application (DA) through the ACT Planning Authority
  • Building Approval
  • Pool safety barrier compliance
  • Compliance with AS 1926.1

Step-by-Step Guide

01
Planning

Installation Configurations

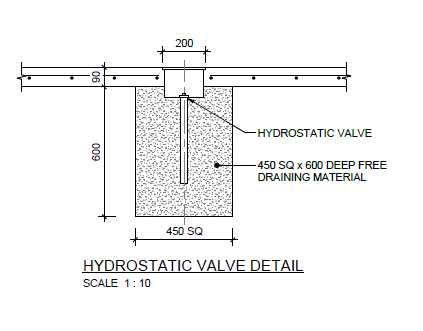
The hydrostatic pressure relief valve requirement varies depending on how the pool is installed relative to ground level. Determine your configuration before commencing work. Refer to engineering drawing 24053-S004 for full detail.

Fully Above Ground

Pool walls are fully above ground and not retaining soil.

Hydrostatic Valve: Not Required Fully Above Ground diagram

Partially Below Ground

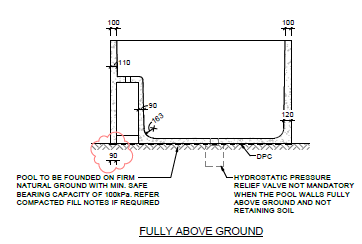
All pool walls retain soil at a maximum height of 850mm or less.

Hydrostatic Valve: Not Required Partially Below Ground diagram

Fully Below Ground

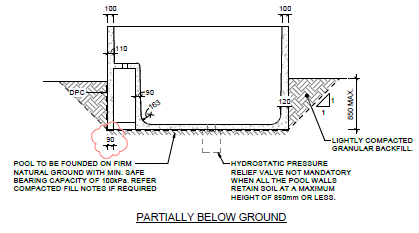
Pool is fully below ground and retaining soil at full depth.

Hydrostatic Valve: Required Fully Below Ground diagram

Fully Earth Retaining One Side

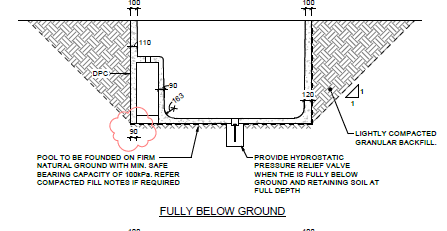
One side of the pool wall is fully retaining soil. Minimum 900mm clearance required on retaining side.

Hydrostatic Valve: Required Fully Earth Retaining One Side diagram

No Earth Retaining One Side

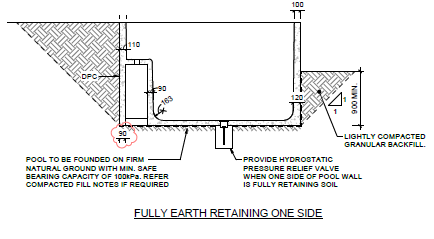
One side of the pool wall has no earth retaining — pool partially set against open ground on one side.

Hydrostatic Valve: Not Required No Earth Retaining One Side diagram
In all configurations: pool must be founded on firm natural ground with a minimum safe bearing capacity of 100 kPa. Refer to compacted fill notes (Step 2) if fill is required.
02
Before Delivery

Site Preparation

Excavation

  • Minimum excavation size: 3.8m wide x 5.8m long
  • Minimum clearance of 600mm at the plumbing end
  • Use a laser level to ensure the hole is perfectly level — do not estimate
  • Where required (refer Step 1), dig the hydrostatic valve pit as per the diagram below — spike must be glued on prior to the pool lift
Hydrostatic Valve Detail — Scale 1:10
Hydrostatic Valve Detail

Geotechnical Requirements

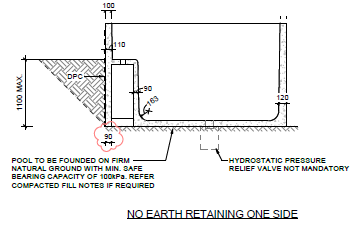
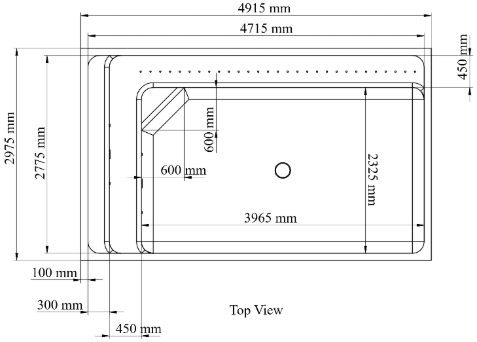
Geotechnical engineering tests are required prior to installation. The base must achieve a minimum safe bearing capacity of 100 kPa per AS 2870 Class S.

ParameterRequired Value
Bearing Capacity100 kPa allowable
Compaction95%
Friction Angle30°
  • Non-reactive soils: lay a base of 10mm rock screenings at 100mm thick, perfectly level
  • Fill sites: engage a geotechnical engineer early — additional engineering required

Compacted Fill Requirements

  • Place fill in layers not exceeding 150mm loose thickness
  • Compact to at least 95% dry density within 2% of optimum moisture content (modified compaction)
  • Filling deeper than 400mm within the building envelope must be tested to Level 1 standard per AS 3798
  • Allowable bearing capacity of filling must not be less than 100 kPa
03
Delivery & Placement

Crane Hire & Lifting

Crane Requirements

  • Crane size will depend on site restrictions — a larger crane may be required
  • Crane hire is the responsibility of the installer — REDI Pool does not supply or arrange
  • Site access requirements must be assessed and managed by the installer prior to delivery

Lifting Equipment Required

  • 4x 5-tonne swift lift clutches
  • 1x 3-metre spreader bar
  • Chain at required length to keep pool level during lift

Placement

  • Keep the pool level throughout the lift and placement
  • Once set, check for level in all directions before proceeding

Lifting Hardware

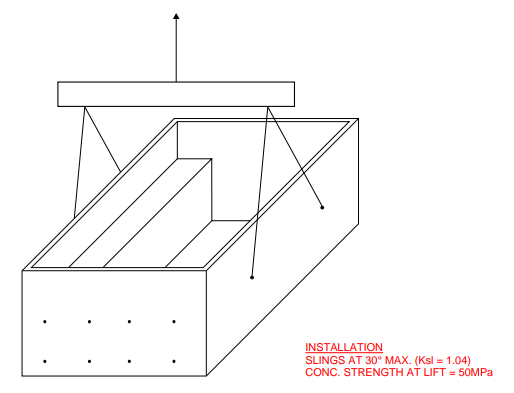
Pre-installed per the REID Lift Design:

Installation Lift Points

REID Elephant Foot M20 x 95 FE20095SS — Hot Dip Galvanised
Max working shear load: 19 kN/insert
Grout after installation.

Installation Lift Diagram

Critical Lifting Notes

All lifting works must be undertaken strictly in accordance with the REID Lift Design and AS 3850:2015. Installation must be monitored by a competent person as required under AS 3850.2.

≤30°
Max sling angle from vertical
2.25
Minimum factor of safety (FOS)
Precast units must remain uncracked and undamaged during all handling, erection, and installation operations. Dynamic impact factor: KD = 2.0.
04
Licensed Electrician Required

Electrical

All electrical work must be completed by a licensed electrician. Do not attempt any electrical connection without a qualified professional.

Earthing

  • An earthing bolt is pre-installed on the pool shell and clearly marked
  • The pool must be earthed by a licensed electrician prior to backfilling
  • Earthing is mandatory — it protects against electrical current near the pool and is a legal requirement

Pool Light

  • Connect the pool light to the 240/12V transformer supplied with the pool

Filtration Power

  • Electrical requirements for filtration and any additional equipment (e.g. heaters) must be confirmed with the equipment manufacturer and your electrician
05
Licensed Plumber Required

Plumbing

All plumbing work must be completed by a licensed plumber.
  • Connect plumbing and direct it towards the filtration system
  • Use sand or screenings to support plumbing lines — do not compact
Warranty condition: The Skimmer Box overflow port must be drilled and plumbed away from the pool base to prevent water saturation near the base. Failure to do so may cause movement and cracking to the pool shell and will void the warranty.

Plumbing specifications and equipment requirements must be confirmed with your licensed plumber and filtration supplier.

06
Post-Electrical & Plumbing

Backfilling

  • Before backfilling, waterproof all lift point voids and fill with non-shrink grout with a minimum 28-day characteristic strength of 50 MPa — this must be completed before any backfill commences
⚠ A specific product recommendation for lift point void grout/epoxy is pending. Contact REDI Pool for the latest guidance before proceeding — production@redipool.com.au
  • Backfill with lightly compacted granular material to allow drainage away from the pool footing
  • Backfill uniformly around the pool shell
  • Compact in 300mm sections as you go — do not bulk fill without compacting
  • All fill in layers not exceeding 150mm loose thickness, compacted to at least 95% dry density within 2% of optimum moisture content
  • Ensure plumbing lines are supported with sand or screenings and are not subjected to compaction load
07
Interior

Finishes

Finish selection and compliance with manufacturer standards is the installer's and client's responsibility. REDI Pool accepts no liability for finish-related issues arising from non-compliance with manufacturer specifications.
Tiled Finish

Tiling

  • All tiled finishes must comply with the grouting and adhesive standards specified by the grout and tile adhesive manufacturer chosen by the client
  • Follow the manufacturer's recommended curing times before filling
  • Finish selection and compliance is the client's responsibility
Pebblecrete Finish

Pebblecrete

  • Once pebblecrete is complete, fill the pool within 24 hours
  • Run as a chlorine pool for the first 28 days before switching to any other system
  • Strongly recommended by REDI Pool — REDI Pool accepts no liability for deviation from this process
08
Commissioning

Fill & Start-Up

  • There is no required wait time between installation and filling (subject to finish manufacturer requirements)
  • Fill and start-up procedures, water balancing, and chemical requirements must be confirmed with the filtration equipment manufacturer and a local pool shop
  • The installer is responsible for ensuring the new pool owner is properly briefed on the correct handover process — consult your local pool shop for a complete client handover checklist
09
Mandatory

Safety & Compliance

Temporary Fencing

Temporary pool fencing must be erected immediately after installation — before any other work continues. Check your local council requirements for specifications — requirements vary by location.

Warranty — Prohibited Modifications

  • No drilling, cutting, or bolting of ladders, decks, fence posts, or any other element to the pool shell is permitted without written permission from REDI Pool
  • Doing so will void the warranty

REDI Pool provides warranty coverage across different parts of the pool construction as set out below:

Part of ConstructionCoverage PeriodWhat Is Covered
Pool Shell — Structural 10 years Defects in materials and workmanship. Subject to correct installation, appropriate maintenance, and normal use.
Pool Shell — Internal Finish 7 years Applies only where the internal finish (e.g. tiling, pebblecrete) was completed by REDI Pool prior to the pool leaving the manufacturer's facility. Finishes applied after leaving the manufacturer's facility, or not purchased as part of the original shell order, are not covered under this warranty. Subject to correct water chemistry and maintenance.
Supplied Equipment Manufacturer's warranty only Any equipment supplied with the pool is covered solely by the relevant manufacturer's original warranty. REDI Pool provides all documentation at handover.

Warranty Exclusions

The following will void or exclude warranty coverage:
  • Failure to follow REDI Pool's installation, handling, and safety requirements
  • Failure to follow certified lift plans or use of incorrect lifting methods or equipment
  • Drilling, cutting, or bolting to the pool shell without written permission from REDI Pool
  • Skimmer box overflow port not drilled and plumbed away from the pool base
  • Poor or inadequate maintenance, including incorrect water chemistry (e.g. calcium leeching, imbalanced pH, alkalinity, or chlorine levels)
  • Unauthorised surface treatments
  • Natural disasters (earthquakes, floods, falling trees)
  • Tree root intrusion, ground movement, or other site-related conditions
  • External environmental factors or site conditions outside REDI Pool's control
  • Damage during transport, loading/unloading, strapping, or handling by third-party operators

Transport & Risk

Warranty coverage applies only after the pool shell has been delivered in good condition and correctly installed at the final site. Once the pool shell is collected from REDI Pool's Darwin facility, all risk transfers to the contracted transport provider. The Purchaser must inspect the pool shell at pickup — collection constitutes acceptance that the shell was supplied in good condition and free from visible defects.

Water Chemistry

The installer/owner is solely responsible for maintaining correct water chemistry in accordance with manufacturer guidelines and relevant Australian Standards. Any deterioration, staining, etching, discolouration, corrosion, or equipment failure caused by incorrect water balance is expressly excluded from all warranties.

For full warranty terms and conditions, refer to your REDI Pool Supply Agreement. Contact production@redipool.com.au with any warranty queries.